
How to Set Up ClickUp for a Small Team (Without Drowning in Settings)
ClickUp has a reputation, and it’s earned: it can do almost anything, which is exactly why so many small teams open it for the first time, spend two hours clicking through settings, and close the tab more confused than when they started. The software isn’t the problem. The problem is that ClickUp hands you every decision at once — views, hierarchy levels, custom fields, automations — with no obvious order to make them in. This guide gives you that order. Rather than a feature-by-feature tour, it’s built around the handful of real decisions that determine whether your team actually adopts ClickUp or quietly drifts back to a shared spreadsheet within a month.
Before going further, it’s worth confirming ClickUp is actually the right call for your team in the first place — AppFinderX’s full ClickUp review is honest about who it fits and who it overwhelms.
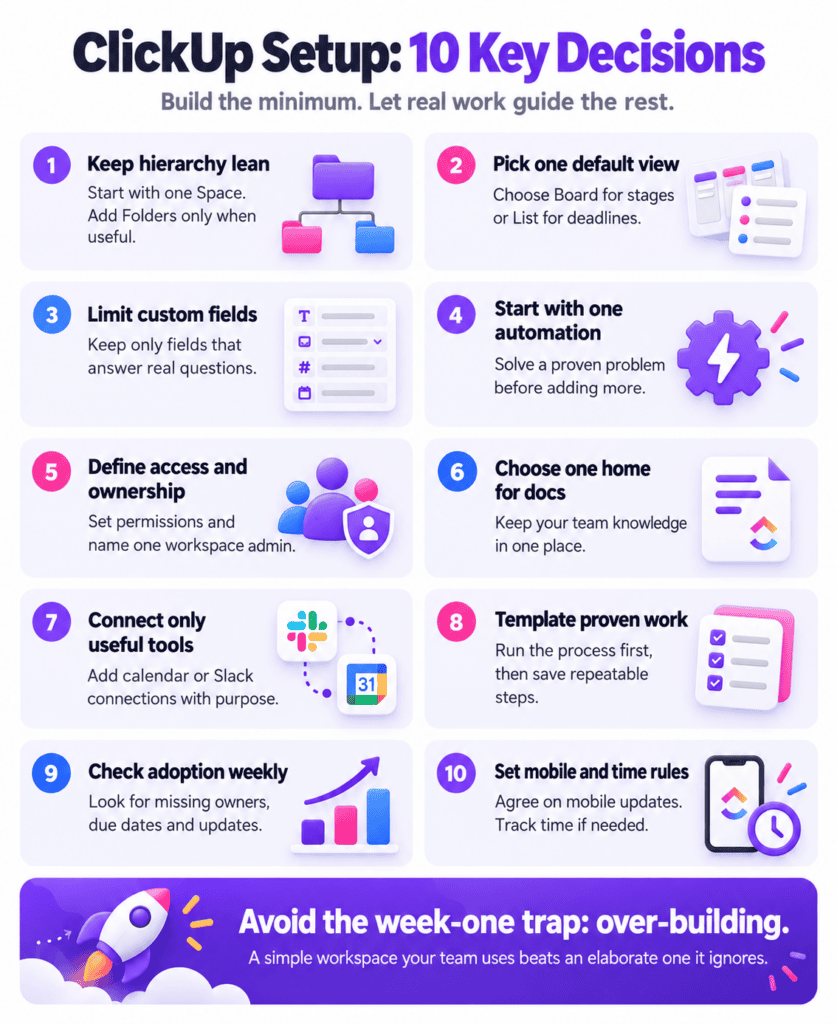
Step One: How Much Hierarchy Do You Actually Need?
ClickUp organizes everything into a nested structure: Workspace, then Spaces, then Folders, then Lists, then Tasks. Most new accounts end up with far more layers than the team needs, mostly because it’s tempting to build out the full hierarchy before you’ve used any of it.
For a small team, a reasonable starting structure is one Space per department or major area of work (say, “Client Projects” and “Internal Ops”), Folders inside each Space only where you genuinely have a recurring grouping (a specific client, a specific initiative), and Lists for the actual projects or workstreams inside those. Skip Folders entirely if your team’s work doesn’t naturally cluster into groups — a flat set of Lists directly inside a Space is completely fine, and it’s much easier to add structure later than to collapse structure nobody ended up using.
Step Two: Which View Is Your Team’s Default?
ClickUp supports List, Board, Calendar, Gantt, and several other views of the same underlying tasks, and it’s genuinely useful that everyone can view the same data their preferred way. The mistake is trying to set all of them up equally well on day one. Pick one view as the team’s actual default — the one everyone pulls up first thing in the morning — and get that one working well before worrying about the rest.
For most small teams coming from Trello or a kanban-style habit, Board view is the most natural starting point. For a team that thinks in deadlines more than stages, List view sorted by due date tends to fit better. Gantt and workload views are genuinely powerful but rarely the right place to start — they reward a team that already has a disciplined task-entry habit, which is exactly what you’re still building in week one.
Step Three: What Custom Fields Actually Earn Their Place?
Every custom field you add to ClickUp is a field someone has to fill in, and fields that don’t get filled in consistently make your reporting worse, not better. Before adding anything beyond the defaults, ask what question you actually want to answer later — “which tasks are blocked on a client,” “what’s the estimated effort on this,” “which department does this belong to” — and add only the fields that answer a question you’ll genuinely ask. Three or four well-used custom fields beat twelve that half the team ignores.
Resist importing a custom field template wholesale from a YouTube tutorial or a template someone shared. It was built for a workflow that isn’t yours, and the fields that don’t map to how your team actually works will just sit there empty, making every task look more complicated than it is.
Step Four: What’s Worth Automating on Day One (and What Isn’t)
ClickUp’s Automations can handle a genuinely wide range of triggers and actions — move a task to a new status and assign it to someone, set a due date automatically based on priority, that kind of thing. The temptation for a team excited about a new tool is to build out a dozen automations in the first week. Don’t. An automation built before your team has a settled process just automates a guess, and untangling a misbehaving automation six weeks in is more frustrating than the manual step it was meant to replace.
Start with one automation that solves a problem you’ve already felt — a common one is automatically notifying a project lead when a task is marked “Blocked,” so it doesn’t sit invisible in someone’s list. Let that one prove itself for a couple of weeks before adding a second.
Step Five: Who Gets Full Access, and Who Doesn’t
Permissions matter more in ClickUp than in a simpler tool because there’s genuinely more to restrict — entire Spaces can be hidden from people who don’t need them, and Guest access lets you bring in a client or contractor without exposing your whole workspace. For a small team, it’s worth deciding upfront whether everyone sees everything (fine for a five-person team with no client-sensitive work) or whether certain Spaces should be locked down (more likely if you’re managing client deliverables, HR-related tasks, or financials inside ClickUp alongside general project work).
Set one person as the actual workspace admin responsible for structural changes — new Spaces, deleted Folders, major permission changes — rather than leaving that open to whoever happens to be in the settings menu that day.
Step Six: Where Does Documentation Live?
ClickUp Docs lets you build out wikis, SOPs, and meeting notes directly inside the same workspace as your tasks, which is genuinely convenient when a task can link straight to the doc that explains how to do it. The decision worth making explicitly is whether Docs becomes your team’s actual knowledge base or whether that job stays with a separate tool like Notion that some teams already have momentum in. Splitting documentation across two tools “for now” tends to become permanent and genuinely annoying — pick one home for it early, even if the choice isn’t perfect.
Step Seven: Which Integrations Are Worth Turning On Immediately
ClickUp connects to Slack, Google Calendar, and a long list of other tools, but turning on every available integration at once tends to create more notification noise than value. The two most commonly worth setting up immediately are a calendar sync (so due dates show up where people already check their schedule) and a Slack connection for task comments or status changes, scoped to a specific channel rather than flooding your main team channel. Anything beyond that is worth adding only once you’ve noticed a specific, recurring manual step you’re tired of doing by hand.
Step Eight: Templates for the Work You Repeat
If your team runs the same type of project repeatedly — onboarding a new client, launching a campaign, shipping a release — ClickUp lets you save a List or a set of tasks as a reusable template, which saves real setup time on the second and third time through versus rebuilding the same structure from scratch. The trap here is the same as everywhere else in ClickUp: building an elaborate template before you’ve actually run the process manually even once. Run the real project first, notice what the recurring steps actually are, and only then turn that into a template. A template built from assumption usually needs reworking anyway, so you’re not actually saving the time you think you are by templating too early.
Step Nine: How Will You Know the Setup Is Working?
It’s worth deciding, before you’re three weeks in, what “this setup is working” actually looks like, because otherwise it’s easy to mistake a quiet system for a healthy one. A useful, low-effort check: once a week, scan for tasks with no due date, no assignee, or no status update in the last week. A small number of those is normal. A workspace where most tasks look like that means the team has drifted back to tracking real work somewhere else — a group chat, someone’s personal notes — and ClickUp has become a formality rather than the actual source of truth. Catching that early is much easier than re-establishing the habit after it’s been broken for two months.
The ClickUp Trap: Over-Building in Week One
If there’s one mistake specific to ClickUp more than almost any other tool, it’s spending the first week building an elaborate system instead of actually using a simple one. ClickUp rewards configuration eventually, but a small team’s real goal in week one is just getting everyone logging and updating tasks in the same place, consistently. A perfectly structured workspace that nobody updates is worse than a messy one that the whole team actually checks every morning. Build the minimum version first — one Space, one default view, a handful of fields — and let real usage tell you what to add next, rather than guessing upfront.
Step Ten: Mobile Access and Time Tracking — Set Expectations Early
If any part of your team works away from a desk, decide early whether ClickUp’s mobile app is the expected way to update tasks on the go or whether field updates happen later from a laptop. Teams that leave this ambiguous tend to end up with a gap between what’s actually happening and what the workspace shows, simply because updating a task from a phone feels like more friction than it should until someone’s actually used the app a few times.
Time tracking is a similar early decision, not because every team needs it, but because retrofitting it is harder than starting with it. If billing, capacity planning, or client reporting depends on knowing how long work actually takes, turn on ClickUp’s built-in time tracking from day one rather than trying to reconstruct historical data later — which is, in practice, impossible. If none of those reasons apply to your team, skip it entirely rather than tracking time nobody will ever look at.
Signs ClickUp Might Be More Than Your Team Needs
Not every small team needs ClickUp’s depth, and it’s worth being honest about that rather than forcing adoption. If your team keeps reverting to a shared doc or a simple list a few weeks in, or if the person responsible for ClickUp admin is spending more time maintaining the system than the team spends using it, that’s a real signal. Trello or Asana might genuinely be a better fit for a team that wants less configuration surface and a faster path to “just working” — both are covered, alongside ClickUp, in AppFinderX’s best project management software guide if you want to compare the three side by side before committing further.
Give It a Real Month Before Judging It
Most of the frustration people report with ClickUp in the first week comes from exactly the trap described above — too much structure, too fast, before the team has a habit of using any of it. Build the minimum setup described here, let the team actually work in it for a few weeks, and revisit the harder decisions — more views, more automations, deeper reporting — once you know what you’re actually missing rather than what you assumed you’d need on day one.